By Stephen Holloway
09 September 1999
Launch Adaptec Toast 3.5 either by using the Office Manager pull-down menu or double-clicking on Hassayampa/Utilities/Toast Folder/Adaptec Toast 3.5.
The main window will appear:
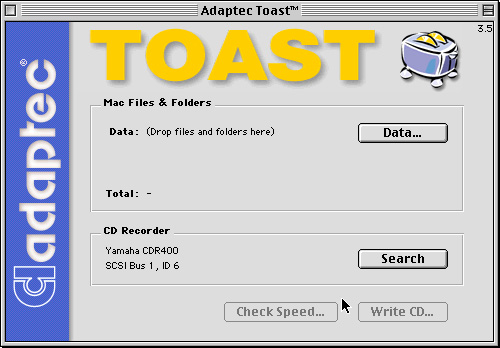
The upper part of the window gives information about the CD format and any data that you have selected. This includes the amount of data and total running time for selected data. This is where you will select format and place your data.
The lower part of the window shows information related to the CD burner, including SCSI ID and brand and model. It should read: Yamaha CDR400, SCSI Bus 1, ID 6. You will not need to alter any information here.
This is the most important step! You have several choices for format. The format you chose will dictate how the data is written, which computer can read it, and whether filenames, folder structure, icons, layout, and extensions are preserved or not. You will most likely use ISO 9660 (Mac, PC, and Unix compatible) or Mac Files & Folders (Mac only).
The following is a summary of the various effects of each format. Additional formats and detailed instructions can be found in the Adaptec Toast for Macintosh manual in the Active Tectonics lab library.
Write a disc that can be run on several platforms (e.g. Macintosh, Unix, Windows, etc.)
Write a multisession CD where all sessions are mounted as a single volume.
Make incremental backups (only changed data is written).
Write to disks that can only be read on Macintosh.
Make easy backups of Macintosh files.
Write open Macintosh files (e.g. system files).
Control Macintosh aliases (writing the alias vs. the target file).
Exactly copy an entire Macintosh volume (e.g. hard disk, partition, CD, etc.) to CD.
Precisely control the visual appearance of the disk (e.g. view, arrangement, nesting, etc.).
Publish the disk (thesis or reference disks).
Create a ‘bootable’ Macintosh disk (system installation or hard drive utilities).
Define a file to be opened automatically upon insertion.
Optimize the data for faster access.
Write to disks that can be only read on Macintosh and PC.
Write Macintosh data only visible to Macintosh users and ISO data only visible to other users.
Write multimedia applications intended for both Macintosh and Windows.
Write image, sound, or text files, which can be read on both Macintosh and Windows.
Write software created for both platforms delivered on one disk.
Write a disk that includes both data files and audio files.
The type of data and format will dictate how the data should be prepared for burning. Again, you will most likely use ISO 9660 or Mac Files & Folders, but Mac Volume and Mac/ISO Hybrid will follow the same rules as Mac Files & Folders.
Alphanumeric filenames in all caps with no punctuation except underscore (_) and up to 8 characters long plus up to 3 characters for the extension (e.g. FILE_123.XYZ).
A single extension (multiple extensions will be truncated to the first extension).
Compatible file format for all platforms (e.g. filename.tif instead of filename.psd).
NOTE: Failure to follow the above ISO 9660 data format will cause the Toast application to force your data to fit the ISO 9660 conventions. This can cause the possible loss of data due to: filename duplication (e.g. file01B.tif will overwrite file01b.tif as FILE01B.TIF); extension removal (e.g. file.blah.tif will be written as FILE.BLA); character removal (e.g. file&0-1 will be written as FILE01); or abbreviation (e.g. thisisalongfilename will be written as THISISAL.ONG). This is not as critical for Macintosh files, but for some PC and most Unix files, any alteration of a filename can irrevocably alter the data, thereby making it unusable. This is especially true for files with headers, multiple parts, logs, temporary files, or inherent pathnames. Always be careful with files from applications such as ERDAS Imagine, ERMapper, Arc/Info, and ArcView. See this email for proof. A separate section on preparing Arc/Info files for archiving can be found at
http://activetectonics.la.asu.edu/LabDocs/UnixArcInfoArchiving.html.Files intended for use only on Macintosh systems.
Filenames compatible with Macintosh systems.
Data should be transferred to the Hassayampa desktop for fastest CD burning. It is easiest to set up a folder on the desktop that represents the CD to be burned. Arrange everything inside this folder as you want it to appear on the final CD.
To import data into the Toast application, drag and drop files and folders onto the Toast window, or click the Add… button. Click Done when finished. There are several options at this point. You can change format, resolve aliases, rename folders, files, and the disc, as well as change visibility and hierarchy of files.
For ISO 9660 format, click on the Settings tab. It should read Format: CD-ROM and Naming: ISO 9660 Level 1. Although it looks like you could use longer filenames by changing the naming setting, it will make the disc unusable for Unix files, and still would only work on Mac and Windows 98/NT, not DOS, Windows 95, Linux, etc.
When all data has been added, the layout has been finalized, and the disc has been named, click Check Speed…. This will check to make sure the data can be sent as fast as the CD burner can write. Check Speed must be done before each session unless the same data is being burned multiple times. If Check Speed fails, the speed can be lowered to 2x by going to Recorder->Write Speed->2x. If Check Speed fails again, consider the layout of your CD. If there are several large (~>50MB) files in succession, consider spacing them throughout the disc or making several smaller files if possible.
After Check Speed has passed, click OK, then click Write CD…. You will be prompted to insert a writeable CD into the burner.
The countdown timer varies from accurate to wildly inaccurate. A reasonable time for 650MB of small files is 30 minutes to 1 hour.
After the CD has finished burning, it will automatically run through a verification procedure. This will tell you if any errors were encountered.
You are now finished with burning a CD. If you want to burn an identical CD you can go ahead and skip Check Speed and click Write CD and insert a second writeable CD.
Quit the Toast application and save the setup only if you will be burning the identical data sometime in the future.